Nrtsearch Tutorial - Indexing Web Content for Search
Tech Blog
April 18, 2023 • ☕️☕️☕️☕️ 18 min read
Let’s use nrtsearch - an open-source search engine built by Yelp - to support text search for any website. In this tutorial, I’m using my blog as an example dataset, but you can apply this approach to index any kind of data.
The plan is to build a simple web crawler to fetch website’s data. Then we start a local nrtsearch cluster with a primary and replicas, design its index schema and set up an indexing pipeline for the search engine. Finally, we define nrtsearch queries to support custom scoring and highlighting. A simple search UI will allow us to interact with the system. All of this will be done with minimal coding. I will use open-source libraries to keep things simple and extensible. You can clone the tutorial code repo to run the code locally. All you need is python3 and Docker installed on your system.
If you want to learn more about nrtsearch, check out Yelp’s Engineering blog post:
Nrtsearch: Yelp’s Fast, Scalable and Cost Effective Search Engine
Let’s start!
Web crawler
The crawler fetches data from websites. In this tutorial I’m using my blog as an example dataset. For simplicity, I supplied a sitemap - a list of urls - so that the crawler can directly fetch the data.
I use beautifulsoup library for extracting website content. The website data can be represented in a following way:
title- website title tagdescription- meta description tag, a short summary of the website, provided by the authorurl- unique website idcontent- extracted text content, e.g. paragraphsheadings- extracted website’s headings, we grouph1,h2,h3, … tags together.
Our code uses get_source_urls() function to get the list of urls. The function will process the HTML pages to extract: title, description, content and headings. After it’s done, it will save the output to a JSON file.
import json
import requests
from bs4 import BeautifulSoup

urls = get_source_urls() # urls from website sitemap

website_data = []

for url in urls:
    response = requests.get(url)
    soup = BeautifulSoup(response.content, "html.parser")

    title = soup.title.text.strip() if soup.title else None
    description = (
        soup.find("meta", attrs={"name": "description"})["content"].strip()
        if soup.find("meta", attrs={"name": "description"})
        else None
    )
    headings = [
        h.text.strip() for h in soup.find_all(["h1", "h2", "h3", "h4", "h5"])
    ]
    content = soup.get_text(" ", strip=True)

    website_data.append(
        {
            "url": url,
            "title": title,
            "description": description,
            "headings": headings,
            "content": content,
        }
    )

with open('index_resources/website_data.json', 'w') as outfile:
    json.dump(website_data, outfile)
The full crawler code is located in crawler/crawler.py, you can run the crawler by executing:
make run_crawlerNrtsearch cluster
The nrtsearch cluster consists of 2 types of nodes:
primary- a single node, responsible for data indexing. It periodically publishes Lucene segment updates to replicas. Hence the name: nrtsearch - near-real time search.replica- one or more nodes, responsible for serving the search traffic. It receives periodic segment updates from the primary. The number of running replicas can be controlled by an auto-scaler (like HPA) to respond to changing search load.
It’s also possible to run the cluster with a single, standalone node, used for both data ingestion and search. It’s ok for experimentation but for production environments it’s recommended to run separate primary and replica nodes.
The source code for nrtsearch cluster setup is available in /nrtsearch folder. There we have:
Dockerfileto setup an nrtsearch node- configs for primary and replicas
docker-compose.yamlwith example cluster configuration
Note: in this tutorial we don’t worry about persisting the index state. If you rebuild your nrtsearch containers, all index state will be lost. In order to persist your index, you can attach a permanent volume to docker containers. For production, it’s advisable to use a dedicated s3 bucket where nrtsearch stores the cluster state - it allows deploying nrtsearch as a stateless service. More about possible configurations in nrtsearch docs.
In order to start the local cluster with a primary and two replicas, run a following command in a separate terminal window:
make startAbove command will run docker compose up that starts the nrtsearch cluster defined in the root docker-compose.yaml file. It will also start a few other services that will be described later. In your terminal window you should see logs indicating that the primary and replicas are ready:
primary-node-1 | [INFO ] 2023-04-16 12:12:42.194 [main] LuceneServer - Server started, listening on 8000 for messagesThe address of nrtsearch nodes depends on whether you connect to them from the host machine of from a different docker container.
- For the host machine, the nrtsearch gRPC server (
8000container port) of each node in the cluster is exposed on a host’s physical port. We use port8000for the primary node and ports8001and8002for the two replicas. - Within docker containers, we can use docker DNS.
primary-nodehostname is used to advertise the primary. All replicas run under thereplica-nodehostname. For all nrtsearch nodes the gRPC server runs on port8000.
You can run docker compose ps, to see ports assigned to containers.
NAME                   IMAGE                COMMAND                  SERVICE              CREATED             STATUS              PORTS
primary-node-1         primary-node         "bash -c '/user/nrts…"   primary-node         About an hour ago   Up About an hour    0.0.0.0:8000->8000/tcp
replica-node-1         replica-node         "./entrypoint_replic…"   replica-node         About an hour ago   Up About an hour    0.0.0.0:8002->8000/tcp
replica-node-2         replica-node         "./entrypoint_replic…"   replica-node         About an hour ago   Up About an hour    0.0.0.0:8001->8000/tcp
Great! Now we have a local nrtsearch cluster with nodes dedicated to data ingestion and search. Even though the containers are now running, no index was created. A new index must be created via a command. Once the index has been started in replicas, they register with the primary. Replication happens only after documents are ingested into the primary.
Now, let’s prepare the client code to interact with our cluster.
Generate gRPC client code using protoc
Clients can communicate with nrtsearch via gRPC or REST API. gRPC is a high-performance remote procedure call framework that enables communication using protocol buffers. This method yields high performance for production applications. The REST API is an optional way to communicate with nrtsearch, suitable for development and experimentation. The REST server (grpc-gateway) is autogenerated from proto definitions.
Let’s use gRPC to communicate with nrtsearch. Since it’s not a REST API we can’t just curl the endpoints. We need to generate the native client code, python for this tutorial, to interact with nrtsearch nodes.
To generate Python client code from nrtsearch proto definitions, you can use the gRPC toolchain’s protoc compiler along with the grpc_tools package to compile the .proto files into Python code. You can then use the generated client code to communicate with the gRPC server. The steps are:
- get all nrtsearch
.protofiles along with their dependencies to a folder, let’s call it/protos - point
protoccompiler to/protosfolder and generate the python code
In the Makefile there are commands nrtsearch_protos and nrtsearch_protos which execute the steps above. They will put the generated code into nrtsearch_client/yelp/nrtsearch/.
# Generate nrtsearch .proto files and their dependencies
nrtsearch_protos:
	mkdir -p protos
	docker build -t nrtsearch-protos-builder:latest ./utils/nrtsearch_protos_builder/
	docker run -v $(shell pwd)/protos:/user/protos  nrtsearch-protos-builder:latest

# Compile client .proto files to python code
nrtsearch_protoc: nrtsearch_protos
	$(PYTHON) -m grpc_tools.protoc \
		--proto_path protos \
		--grpc_python_out nrtsearch_client \
		--python_out nrtsearch_client \
		protos/yelp/nrtsearch/luceneserver.proto \
		protos/yelp/nrtsearch/search.proto \
		protos/yelp/nrtsearch/analysis.proto \
		protos/yelp/nrtsearch/suggest.proto
	rm -rf protos
In order to nrtsearch .proto files and their dependencies we use a simple Dockerfile that compiles the project and moves all proto files into the persistent volume /protos. Then protoc compiler compiles them to python code. After running make nrtsearch_protoc you can verify that the client code was generated successfully:
ls nrtsearch_client/yelp/nrtsearch/
analysis_pb2.py          luceneserver_pb2.py      search_pb2.py            suggest_pb2.py
analysis_pb2_grpc.py     luceneserver_pb2_grpc.py search_pb2_grpc.py       suggest_pb2_grpc.py
Index schema
In order to ingest the data into nrtsearch, we must first create an index and register the fields. Appropriate schema design will enable efficient search and results highlighting for blog data.
The blog_search index needs to represent the data returned from the crawler: url, title, description, headings and text content.
- We use
TEXTtype for each field, as this allows to the data to be tokenized and indexed with index-time analyzer. - The nested field
url.idhas_IDtype - it defines the unique Lucene document id. Note, theurlfield hasTEXTtype as we still want to search for keywords within the url - Each field is searchable (
search: true), tokenized (tokenize: true) and is stored in column-oriented way (storeDocValues: true). - The
content.analyzedfield contains the index-time analyzed webpage content. We define a custom analyzer which removes any html characters (htmlstripcharFilter), usesstandardtokenizer andkStem,stopandlowercaseLucene token filters. In order to support the Fast Vector Highlighter for results highlighting, we settermVectors,storeandtokenizeproperties.
The blog_search index schema is located in index_resources/index_schema.yaml and defined as:
indexName: blog_search
field:
  - name: url
    type: TEXT
    search: true
    storeDocValues: true
    tokenize: true
    childFields:
      - name: id
        type: _ID
        search: true
        storeDocValues: true
  - name: title
    type: TEXT
    search: true
    storeDocValues: true
    tokenize: true
  - name: description
    type: TEXT
    search: true
    storeDocValues: true
    tokenize: true
  - name: headings
    type: TEXT
    search: true
    storeDocValues: true
    tokenize: true
    multiValued: true
  - name: content
    type: TEXT
    search: true
    storeDocValues: true
    tokenize: true
    store: true
    termVectors: TERMS_POSITIONS_OFFSETS
    childFields:
      - name: analyzed
        type: TEXT
        search: true
        store: true
        termVectors: TERMS_POSITIONS_OFFSETS
        tokenize: true
        analyzer:
          custom:
            charFilters:
              - name: htmlstrip
            tokenizer:
              name: standard
            tokenFilters:
              - name: lowercase
              - name: kStem
              - name: stop
More information about the nrtsearch field types, schema design and supported analyzers is available in the nrtsearch docs.
Create nrtsearch index
Now it’s time to create and start an index for blog data. We have a running nrtsearch cluster, generated client code and the index schema.
To configure the index on primary and replicas, we need to run several requests in order.
- CreateIndexRequest - creates the nrtsearch index with a given name
- SettingsRequest - sets Lucene-related index settings
- StartIndexRequest - starts the index in a given mode (
STANDALONE,PRIMARYorREPLICA), additionally for replicas we need to specify primaryhost:portfor index replication - FieldDefRequest - registers index schema
- CommitRequest - commits the newly created index. It ensures its state is preserved in s3 or other persistent storage
Each docker compose container has assigned a fixed host:port (see docker-compose.yaml) so I’m using dummy service discovery to discover and communicate with nrtsearch nodes from the host machine:
# Simple service discovery for scripts ran from host machine
SERVICE_DISCOVERY = {
    "primary-node": ("localhost", 8000),
    "replica-node-0": ("localhost", 8001),
    "replica-node-1": ("localhost", 8002),
}
In nrtsearch_client/client.py we have the gRPC client which communicates with our cluster nodes:
@lru_cache(3)
def get_nrtsearch_client(host, port):
    channel = grpc.insecure_channel(f"{host}:{port}")
    return LuceneServerStub(channel)
The script in nrtsearch_client/setup_index.py creates clients for each node and executes the above commands in order, using the protobuf generated code. You can run the script for index setup locally via make setup_index.
The process of starting the index is slightly different for replicas and primaries. For example, the start_index_replica() starts the index in REPLICA mode and registers to primary to listen for index updates. The primaryAddress="primary-node" is defined in docker-compose.yaml and the 8001 replication port comes from the primary server configuration. Note that replicas use the internal Docker network to communicate with the primary so we don’t need to expose the replication port.
You can verify that the blog_search index is created on each node by running make index_status. The output should look like:
IndicesRequest for: primary-node
indicesResponse {
  indexName: "blog_search"
  statsResponse {
    dirSize: 96
    state: "started"
    taxonomy {
    }
    currentSearcher {
      segments: "IndexSearcher(StandardDirectoryReader(segments_1:2:nrt); executor=ExecutorWithParams(sli
ceMaxDocs=250000, sliceMaxSegments=5, virtualShards=1, wrapped=java.util.concurrent.ThreadPoolExecutor@4a
bd0a9d[Running, pool size = 0, active threads = 0, queued tasks = 0, completed tasks = 0]))"
    }
  }
}

IndicesRequest for: replica-node-0
indicesResponse {
    #...
}
If you restart the nrtsearch container, you will see that even though the state files are still present in the volume, the index won’t be started. Nrtsearch expects a startIndex command after server restart. In the nrtsearch_client/setup_index.py script we have extra logic to handle following scenarios:
blog_searchindex is not returned from theindices()call. It means that the index doesn’t exist. We need to execute all 5 steps to create an index.blog_searchindex exists but isnot_started. This can happen when you restart a Docker container. We need to just issue theStartIndexRequest.blog_searchindex exists and it isstarted- all good, index is already running.
Great! Now we have a running nrtsearch cluster and our index is started and replicated between primary and replicas. Let’s move on to data ingestion.
Nrtsearch indexer
In order to ingest data into nrtsearch we can use the addDocuments client method. It allows streaming multiple AddDocumentRequest to the primary for indexing.
A single call to addDocuments can contain multiple documents in the payload. You can call it a bulk update. It’s more efficient when indexing a large amounts of documents. Therefore, it’s advisable to batch your documents and ingest them in bulk for production use-cases.
There is no transaction log, so you must call commit periodically to make recent changes durable on disk. This means that if a node crashes, all indexed documents since the last commit are lost. (docs)
When ingesting our data to nrtsearch we need to call commit periodically to ensure our data is persisted. It works very well with streaming frameworks, like Flink, where you can call commit every time your Flink application checkpoints. The checkpoint is successful if and only if the commit call succeeds.
I use a python script, which batches docs and ingests them into the primary and commits the index. Then, we can inspect the replica state to check if index segments were replicated.
# For prod cases we can even make it 1000, taking small value for this tutorial
BATCH_SIZE = 10


# Load the data processed and saved by the crawler
def _load_website_data():
    with open("index_resources/website_data.json") as f:
        data = json.load(f)

    return data


# Prepare the request payload
def _prepare_document_stream(docs):
    for doc in docs:
        fields = {
            "url": AddDocumentRequest.MultiValuedField(value=[doc["url"]]),
            "title": AddDocumentRequest.MultiValuedField(value=[doc["title"]]),
            "description": AddDocumentRequest.MultiValuedField(
                value=[doc["description"]]
            ),
            "headings": AddDocumentRequest.MultiValuedField(value=doc["headings"]),
            "content": AddDocumentRequest.MultiValuedField(value=[doc["content"]]),
        }

        yield AddDocumentRequest(indexName=INDEX_NAME, fields=fields)


# Use gRPC streaming to send documents for ingestion
def index_document_stream(primary_client, doc_stream):
    response = primary_client.addDocuments(doc_stream)
    return response


def run_indexer():
    # Just index data to primary - data will be replicated to other nodes in the cluster
    host, port = SERVICE_DISCOVERY.get("primary-node")
    primary_client = get_nrtsearch_client(host, port)

    website_docs = _load_website_data()

    # Split data into chunks for bulk ingestion
    chunked_website_docs = chunked(website_docs, BATCH_SIZE)

    # Process each chunk of docs in bulk
    for idx, docs_chunk in enumerate(chunked_website_docs):
        doc_stream = _prepare_document_stream(docs=docs_chunk)
        index_response = index_document_stream(primary_client, doc_stream)

    # Call commit after docs are ingested
    commit_response = commit_index(primary_client)
You can start the script by running make run_indexer. After the script is done, let’s check the number of docs in each nrtsearch node - to verify that updates were propagated to replicas.
> venv/bin/python nrtsearch_client/get_indices.py
IndicesRequest for: primary-node
indicesResponse {
  indexName: "blog_search"
  statsResponse {
    maxDoc: 21
    numDocs: 21
    ...
    currentSearcher {
      numDocs: 21
      ...
    }
  }
}
...
IndicesRequest for: replica-node-1
indicesResponse {
  indexName: "blog_search"
  statsResponse {
    ...
    }
    searchers {
      numDocs: 21
      ...
    }
    ...
  }
}
We can see that data was successfully replicated between primary and replica nodes - both report 21 docs in their index. Great! 🎉
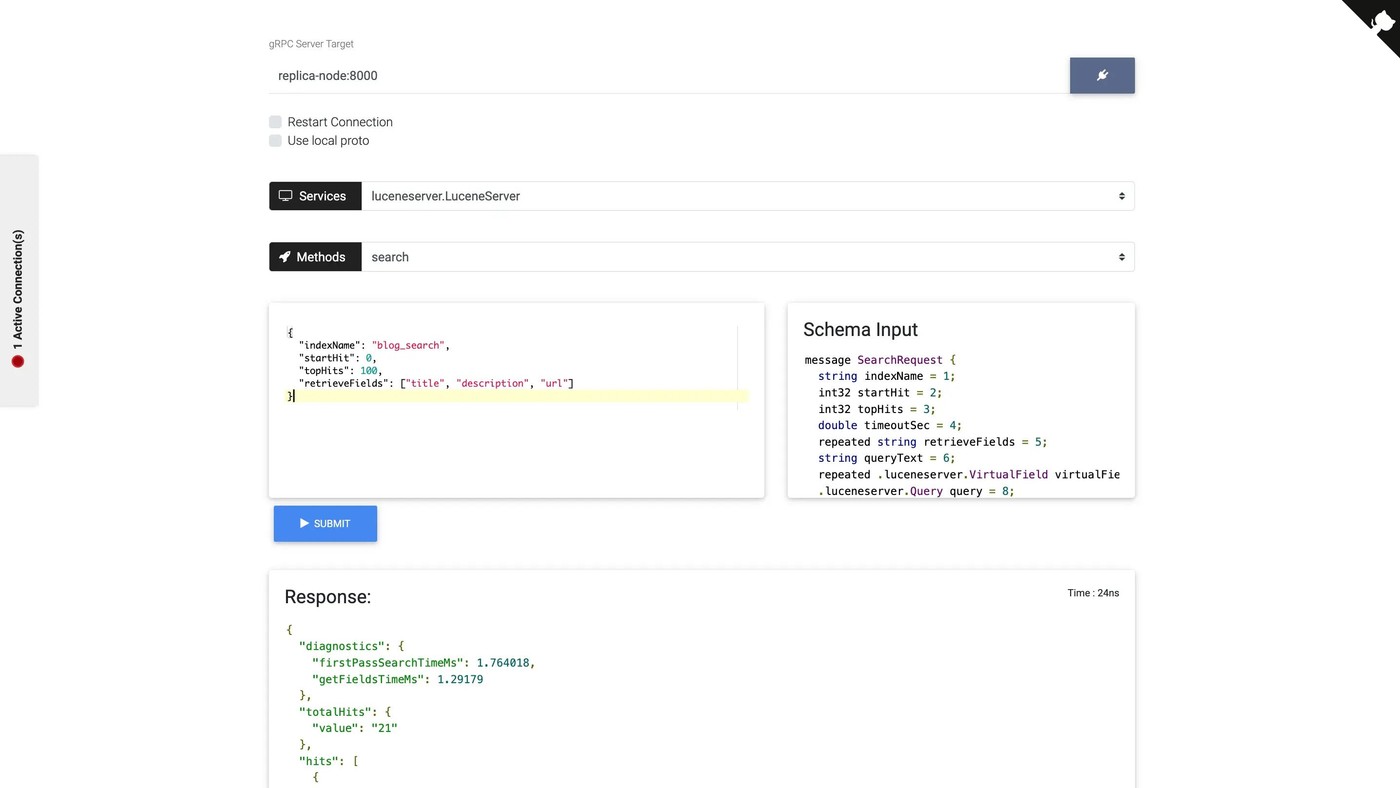
gRPCox web UI
gRPCox is a web UI wrapper for gRPCurl. It’s a simple but useful tool that lets you interact with gRPC servers. It’s optional for the tutorial but I want to show how it enables ad-hoc communication with the nrtsearch server.
The UI was started as one of the services invoked by the make start command and is accessible on localhost:6969. The primary is advertised under primary-node hostname, and replicas are advertised under replica-node (you can inspect logs to find IP of each replica). The nrtsearch gRPC server runs on port 8000.
Let’s connect to the primary node and run a simple search request to explore the index.
- Connect to primary at
primary-node:8000 - Select
luceneserver.LuceneServerservice. You should then see all available gRPC methods and their schemas.
We will use search and pass this query to explore docs in the index (note, since the query field is empty it will return all documents).
{
  "indexName": "blog_search",
  "startHit": 0,
  "topHits": 100,
  "retrieveFields": ["title", "description", "url"]
}
You should see the search results in the UI.
Custom search ranking
The Lucene’s scoring algorithm considers the frequency and distribution of terms in the document and query vectors. For our scenario it should suffice to return documents that match the user search query. We can add custom weights to prioritize results that contain the search term inside title, description, headings, url and content. We can start with simple weights, test our system and refine the algorithm as necessary to improve search results.
Building Nrtsearch Queries documentation page contains supported query types along with examples and explanations. Since nrtsearch is based on Apache Lucene, its query types map closely to Lucene queries. It’s possible to customize queries for each field based on specific search requirements. You can combine the queries using a BooleanQuery with multiple clauses. For example, you could use a MatchPhraseQuery to search for exact phrases, or a add fuzziness parameters to MatchQuery to search for approximate matches.
The search query used for retrieving hits from blog_search index is defined in nrtsearch_client/searcher.py. We combine multiple MatchQuery and MatchPhraseQuery queries to recall and score documents based on their title, description, headings, url and content.
Highlighting support
Highlights are used to retrieve information about matched terms in a hit. Nrtsearch currently supports the Fast Vector Highlighter in Lucene.
Results highlighting is configured in the search request’s highlight field. Nrtsearch returns matched terms in a hit wrapped in pre_tags and post_tags. In this tutorial I use the <em> html tag to emphasize the highlighted content.
search_request = SearchRequest(
    indexName='blog_search',
    retrieveFields=["url", "title", "description"],
    query=Query(...),
    highlight=Highlight(
        fields=["content", "content.analyzed"],
        settings=Highlight.Settings(
            pre_tags=["<em>"], post_tags=["</em>"]),
    ),
)
To be able to highlight a field with FVH, the following settings must be enabled when registering the field:
- The field must be a
TEXTfield - The field must be stored:
“store: true” - The field must have term vectors with positions and offsets:
“termVectors: TERMS_POSITIONS_OFFSETS” - While not mandatory, the field must be tokenized for the highlights to be useful:
“tokenize: true”
Client-side load balancing
Client-side load balancing allows gRPC clients to distribute load optimally across available nrtsearch replica servers.
The configuration to distribute the load across replicas, with round robin policy, looks as follows for our python client:
def get_search_replica_client():
    channel = grpc.insecure_channel(
        "replica-node:8000", options=[("grpc.lb_policy_name", "round_robin")])
    return LuceneServerStub(channel)
replica-node is a DNS record that resolves to multiple IPs - each running a gRPC server at port 8000. The client will distribute requests over the created channel evenly among multiple IPs.
In order to verify that replica-node resolves to our replica IPs, we can run a dig command within any of the created docker containers. There are two IP addresses in the response, 172.20.0.6 and 172.20.0.7, which correspond to the IP addresses of our replicas.
dig replica-node

; <<>> DiG 9.18.13 <<>> replica-node
;; global options: +cmd
;; Got answer:
;; ->>HEADER<<- opcode: QUERY, status: NOERROR, id: 25431
;; flags: qr rd ra; QUERY: 1, ANSWER: 2, AUTHORITY: 0, ADDITIONAL: 0

;; QUESTION SECTION:
;replica-node.                  IN      A

;; ANSWER SECTION:
replica-node.           600     IN      A       172.20.0.6
replica-node.           600     IN      A       172.20.0.7

;; Query time: 3 msec
;; SERVER: 127.0.0.11#53(127.0.0.11) (UDP)
;; WHEN: Sun Apr 16 08:34:39 UTC 2023
;; MSG SIZE  rcvd: 86
Nrtsearch exposes Prometheus /metrics endpoint. You can set up Grafana dashboards to see how search traffic is balanced between your running replicas.
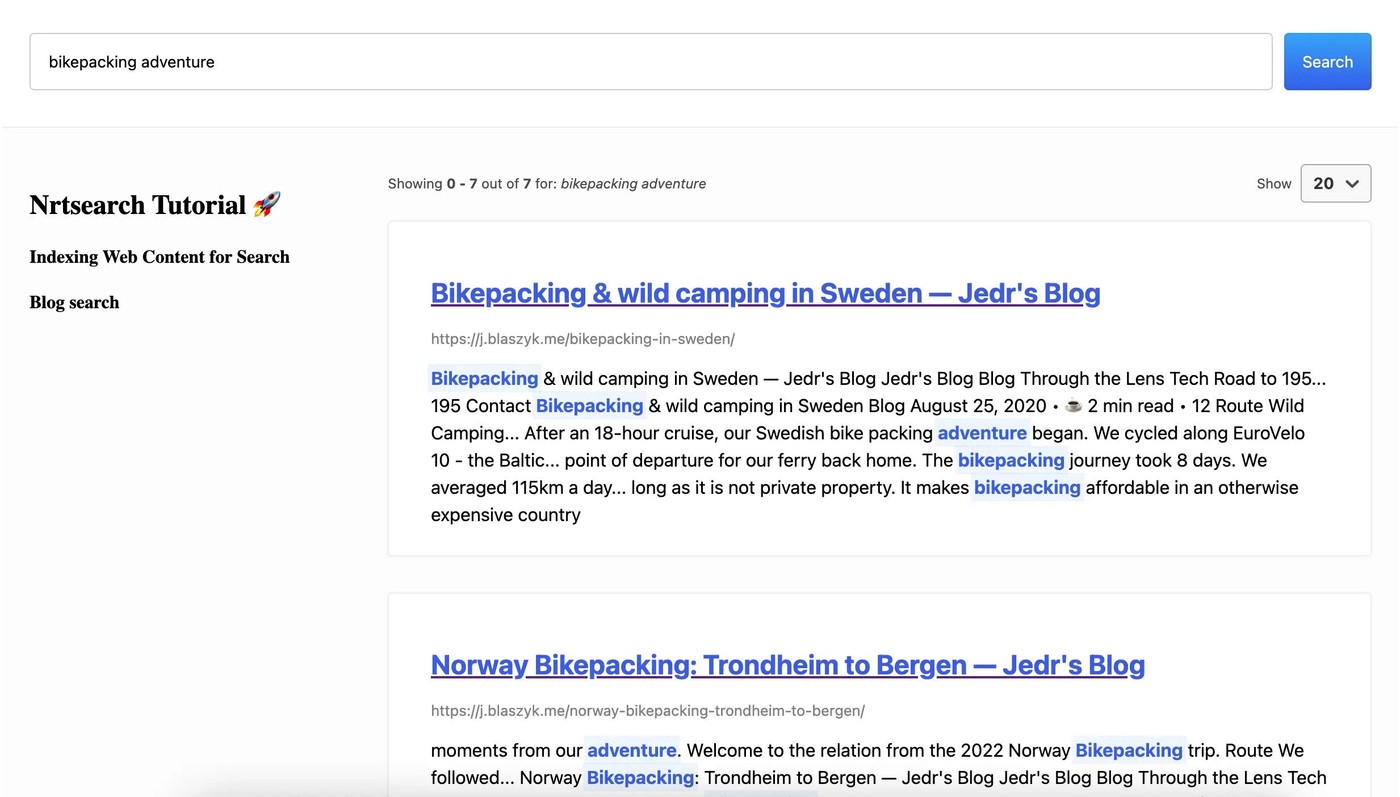
Search UI
Our Search UI is a simple server-side React app. It was bootstrapped with npx create-next-app command. I used @elastic/search-ui React components to define the app UI in less than 100 lines of frontend code. The library supports custom connectors. The Search UI is connected to our searcher API - a simple Flask server with /search endpoint.
It was started by running make start and should be accessible on localhost:3000. You can make a few search queries to see how our custom search ranking works.
Putting it all together
Configuration for every service mentioned in this tutorial is in the docker-compose.yaml file. In order to start this project locally you need to execute four commands:
make start- starts the nrtsearch cluster, search UI and search API server, and the gRPC web UI. It also generates nrtsearch client python code usingprotoccompiler.make start_index- starts theblog_searchindexmake run_crawler- crawls web datamake run_indexer- indexes crawled web data
You can access the Search UI on your host machine localhost:3000 to issue search queries. The web UI for sending gRPC commands to nrtsearch is available at localhost:6969.
You can index more web data by editing and adding sources to the crawler.py code. Keep in mind that when crawling websites with scripts, it is crucial to respect the robots.txt file. Some websites, including Wikipedia offer database dumps to limit unnecessary crawling.
I hope this tutorial is a helpful introduction to data indexing with nrtsearch. Happy hacking!